Monday, October 25, 2010

Dirt Balls...

Entry #2 of Scrumptious Desserts:
So my crazy mom made these a LONG time ago, she loves to try new recipes too, I wonder where I get it! They are really easy to make, easy to serve when company comes over or for a party because you can make them ahead of time. They are perfect too for that custom taste of yours- you can add whatever toppings suit your fancy and they will be great every time! By the way, have you every tasted the French Vanilla Ice Cream from Trader Joe's... it's one of the best vanillas I have ever tasted- really creamy and really flavorful!

Ingredients
french vanilla ice cream
chocolate wafers or Oreo cookies (with the centers scraped out)
toppings (carmel, butterscotch, hot fudge, whip cream, or fresh fruit... or all of the above!)

Directions:
First (and ALWAYS!) you are going to WASH YOUR HANDS because you have to handle the ice cream to make them into balls! You are going to chop or smash your chocolate cookies into crumbs, I put mine in a Ziplock Freezer bag and smash them with a rolling pin. Once they are finely smashed, pour them onto a plate. Then you are going to scoop your ice cream and create a ball to the size that you would like, shaping it with your hands- warning this part is cold- and stick it in an air tight container to "refreeze" because they will melt a bit while you are trying to form them. After about 20 minutes in the freezer, take them out and roll them around on the cookie crumb plate- you can put them back in the freezer until you are ready to serve them or use them immediately. When it comes time to serve them, set it on a plate with drizzled hot fudge & berries, or add a dollop of carmel or whip cream- or put it in a cupcake liner and let your guests chose their toppings. You can't go wrong!

200th POST- thanks to those of you who have left comments, I will be picking a name at 10pm on Thursday, October 28th and the winner will be announced on the 29th! Thanks for joining the fun!!! Don't forget to leave your comment if you haven't already!

Sunday, October 24, 2010

Homemade Rocky Road Ice Cream

So, thanks to Lisa, who left a request for some frozen treats on this blog- we are going to dedicate to her an ENTIRE week of SCRUMPTIOUS homemade treats to enjoy! Some of them are going to defy the rules of "healthy" but they won't lack in flavor or fun... stay tuned all week to find something that you might like to" treat" yourself with!


Entry #1 of Scrumptious Desserts:
Wow, so this is de-licious, and doesn't exactly qualify with the "healthy" motto of this blog calories-wise, but I always prefer to make something homemade... so think of it that way- you are getting just what YOU put into it and nothing extra (that's usually in fine print) that some ice creams add! This ice cream is so yummy AND creamy AND chocolatey good, I couldn't resist including it in this weeks "Scrumptious Desserts" for all to enjoy!

Ingredients:
1 can sweetened condensed milk (14 oz.)
1/2 cup unsweetened coco powder
2 cups heavy cream
1 cup whole milk
1/2 tsp. cinnamon
1/4 tsp. salt
1 TBSP vanilla extract

Directions:
In a sauce pan heat your milk and coco powder until it is smooth and slightly thickened (about 5 minutes). Then remove it from the heat and let it cool. Add your cream, milk, vanilla and spices (including vanilla). Stir and refrigerate until cold. Then pour in your mixture into your FROZEN ice cream canister. Last add your nuts and marshmallows and freeze until hardened.

Recipe from: the kitchen of Debbie Zaballos, my mama

And a birthday shout out to my sister-in-law Lisa, thanks for the FUN request- We hope you had a great birthday, we love you and are thankful for you... and your love for desserts! :)

Wednesday, October 20, 2010

200th Post, Elderberries & a Give Away....

(Fresh Elder Berries)

WOW, can't believe I made it to 200! Thanks for checking in every once in a while, hopefully you have found some recipes to try or tips to use in your own cooking adventures!

I wanted to do a "different-than-normal" post (beings that it is the 200th one I've done!!!) and I couldn't think of a more perfect one than the newest Elderberry Concoction that I have just tried, it could be my MOST FAVORITE HOME REMEDY YET! I have been hearing a lot about Elderberries everywhere I turn. It seems they are really making a name for themselves- whether it be with Dr. Oz & Oprah (via my mom, I don't have cable!), the health articles and websites I check out, or one of my all time favorite blogs Passionate Homemaking where I found this recipe and tutorial video on how to make your own Elderberry Syrup for PREVENTING sickness and HEALING soar throats and cold like symptoms- perfect timing for the winter months ahead, right?

I am a big fan of trying things out that prevent sickness (especially with little kids in my house all the time- even more so when I taught 6 year olds all day long- and now MOST importantly because I am about to have a newborn in the house during cold & flu season!) so I jumped on the opportunity and thought it was worth giving it a shot..... AND I AM SO GLAD I DID!

Most of the ingredients are ones you have on hand or things you can find at your local grocery store, with the exception of the Dried Elder Berries. I purchased these online and they shipped rather quickly from Mountain Rose Herb Company. I bought an 8 oz. bag in hopes that it would last me a few rounds (note: if you use that site, you have to make a minimum $10 purchase).

It's so simple to make, watch this video posted on Passionate Homemaking or follow the instructions below. If you don't want to make your own, you can purchase it as well, but it's much more cost effective to give it a whirl yourself!


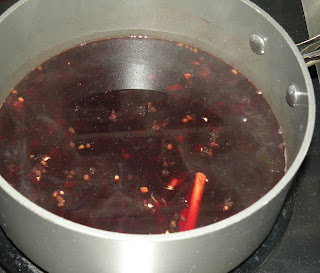
In a small sauce pan bring to boil the following ingredients:
1/2 cup dried elder berries
2 cups water
5 cloves
1 cinnamon stick
1 TBSP freshly grated ginger
***(you will also need 1 cup local or wild honey later in the recipe)


Once that comes to a boil, turn it down and allow it to simmer with the lid on for 20 minutes until the liquid reduces by half. Remove it from the heat and pour all the ingredients through a strainer and into a bowl. Gently press the Elder Berries to remove all the juices from them. Then add 1 cup honey to your elder berry juice that you have just poured into a bowl. (NOTE: I have made this recipe many times since posting it and have cut the honey in HALF so that it's not as sweet, it still packs the same punch though!) Stir it well, let it cool on your counter top, then transfer it to a jar with a sealing lid and store it in your fridge for 3-4 weeks. This syrup is safe for both adults and children alike. (NOTE: Remember there is HONEY in the recipe so it isn't recommended for children under 2. Just make sure everyone else in the household is taking it to lessen the chances of sickness spreading!)
Directions on how to take it:
You can take this Elder Berry Syrup as a preventative & to boost your immune system by taking 1 tsp. daily. Or you can also take it if you feel sickness coming on or have already gotten sick (flu, soar throats, colds, aches and pains, or anything viral) up to 1 TBSP per hour.

Hope this post will help you throughout the cold season, I am so glad I found this concoction right in time! Let me know if your feedback!

200th POST & a Trader Joe's Gift Card Give Away:
Now because it's the 200th post, leave a comment sharing a favorite recipe from this site or a request for a certain kind of recipe you'd like to see in the future and win a $10 Trader Joe Gift Card... because Trader Joe's is my favorite store and my home away from home :) Just a little something fun! Give away will end in ONE WEEK on October 27th and the winner will be posted on the 28th- so stay TUNED!

Monday, October 4, 2010

Sauteed Spaghetti Squash....

So, the other day, my girl Monica posted on FB how excited she was the Spaghetti Squash was back in the season, and she also let me in on her favorite way to cook it.... her recipe is on my meal plan this week, so I look forward to posting it soon- but for now, here is a simple and easy way to cook it as a side dish (or add left over chicken to it and serve it as dinner). Do you have a favorite way to cook it or a stellar recipe you use??? Share it with us!!! Stay tuned for Monica's Spaghetti Squash tips...

Ingredients:
1 spaghetti squash
1/2 red onion, finely chopped
2 cloves garlic, minced
Grape seed oil
s & p
1 TBSP parsley, chopped
*** (optional) handful of parmesan cheese
*** (optional) chopped (cooked) chicken

Directions:
Cut your spaghetti squash in half length-wise (as in picture above) and scoop out the center seeds. Then turn FACE DOWN on a foil lined roasting pan or cookie sheet. Bake for 40 minutes on 350 until it's tender, but still crunchy . Let them cool for about 5 minutes until you can handle them. In a large skillet, heat some Grape Seed Oil, your red onion and garlic and saute for a few minutes. Then , using a fork, scrape out the insides of the spaghetti squash- which will look like SPAGHETTI!!! Add it to your pan and let it cook for another 5 minutes, turning frequently. Add your parsley, s & p, and chicken and cook for a bit longer. Top with shredded parmesan, let it melt in and then serve!

Sunday, September 19, 2010

Roasted Eggplant Soup

Branching out. That's what I am doing.... thanks to my Abundant Harvest Organics Veggies that I get weekly. Because I receive certain things in my box, I am encouraged (or forced if I don't want to be wasteful which is one of my main goals when it comes to my kitchen!) to try new things, things I wouldn't necessarily come up with on my own. So this week, I not only got tomatoes, onions, and eggplant in my box- I also got a recipe for a Roasted Eggplant Soup that I had never tried... and I tried it.... and I liked it.... and I would make it again! So I am passing on the recipe to you, give it a chance, put a little pep in your step and branch out too- you never know what you will come across!

I personally think this soup would be perfect for a dinner party as the appetizer, or a luncheon served along with a light salad. We had it tonight for dinner with a hardier salad and I thought it was perfect, it reminded me of something you would order at a quaint little restaurant! I omitted the crumbled cheese, for preference sake, but it was delicious just the same.

Ingredients:
1 large egg plant or 2 medium ones, halved
3 tomatoes, halved
1 onion, halved
4 large cloves of garlic, peeled
Grape seed oil or Olive Oil
Salt & pepper
1 tsp dried thyme
4 cups chicken broth
1 cup heavy cream
** 3 ounces crumbled cheese of your choice** optional

All your veggies ready to roast, lightly brushed with Grape Seed Oil and sprinkled with S & P.
After Roasting for 40 minutes...
Directions:
Wow, this soup is easy on the prep, it takes awhile as far as actual cooking time, but honestly, it's very little hassle. You are going to wash and half your veggies and peel your garlic, placing them on a foil-lined roasting pan or cookie sheet and pop them in the oven at 400 for 40 minutes until they are lightly browned. Then scoop them up and into a pot they go with the chicken broth and thyme. Bring that to a boil and then let it simmer for another 35 minutes. From there, take and dump it in your Vitamix or Food Processor and puree it, add it back to your pot, add your heavy cream and bring it to a simmer again. Serve it up in soup bowls or mugs and add your crumbled cheese it you'd like!

Wednesday, September 15, 2010

Homemade Croutons


When I think of croutons, I think of my childhood... I was the kid that liked to sneak a handful of croutons from the salad bar when no one was looking! I loved them as a little snack.... regardless or not if they were on top of a salad! But in my adult years, I haven't really seen much of them, I guess I kinda forgot about them... I have just gotten used to adding nuts and seeds to my salads and have neglected the long lost little croutons- that is until now. You have to admit they are a fun little treat... and way better homemade than store bought! Honestly, if you have never had fresh, homemade ones- you MUST try this recipe... you'll thank me later!

I had some left over Ciabatta bread on my countertop the other day and I was thinking of a way it could go to use and not be wasted... at the same time I was desiring a little change to my daily dinner salads that I make- and WHA-LA! Just like that, I found myself making a batch of homemade, crunchy, seasoned, crispy, way-better-than-any-boxed-crouton-you-have-EVER-tried kinda a crouton for dinner. Here's all you need to make your own...

Ingredients:
Day old Bread, at least 1/2 a loaf
Grape Seed Oil (or Olive Oil)
sea salt
garlic powder
dried herbs (basil, thyme, oregano, or parsley)

(I seasoned this batch with salt, garlic powder, oregano & thyme)
Make sure they aren't stacked on top of each other for even baking!
Directions:
SO simple. Cut your bread into cubes, I prefer my croutons a little on the smaller side, (1" x 1") but if you want bigger ones, no one is stopping you! Throw them all in a bowl, drizzle your oil on them (I used Grape Seed Oil but you can use Olive Oil if that's what you cook with). Then season them to your liking with your preferred flavors, toss them well and then spread them in a single layer on a roasting pan or cookie sheet lined with foil. Bake on 350 for 20 - 30 minutes. If you prefer yours softer, go 20, if you like them brown and crunchy and toasted (like me!) you will be closer to 30! Let cool for a few minutes and enjoy! They will store up to 2 weeks in an air-tight container or ziplock bags!

Sunday, August 29, 2010

Homemade & Fresh Peach Crisp

Can I just start by saying this is SOOOOO simple... honestly- it takes no time at all to whip up this scrumptious dessert! I look forward to making some all winter long now that I have fresh frozen peaches waiting for me in my freezer! For those of you not familiar with cobblers, it's kinda like a pile of fruit with some yummy crunchy stuff on top- no crust underneath.

Ingredients:
6-7 juicy, fresh peaches (pitted, peeled, and sliced)
2 cups oats
3 TBSP whole wheat flour
1/2 cup brown sugar
1/2 cup melted butter
1 tsp cinnamon
1/2 tsp nutmeg
1/4 cup pecans or walnuts, finely chopped

Step 1: Fresh peaches- peeled, pitted, and sliced right into the dish!
Step 2: Mix up the topping. That's it.
Directions:
Simple. Wash, peel, pit and slice your peaches right into your 9 x 13 pyrex dish. Then mix up the remaining ingredients in a bowl, pouring your melted butter in last and mixing it until it's a crumbly topping. Scoop your crumbly topping out of the bowl and onto the top of the peaches, pop it in the oven on 375 for 30 minutes and cook until it's got a nice golden crisp color on top. It is best served warm with vanilla ice cream- but I am not gonna lie- it's delicious the next day chilled as a leftover delight!

Please excuse my old rickety pyrex dish, my cute one was in use!