Sunday, December 26, 2010

Butternut Squash Soup


Here's another wonderful winter soup, not a ton of ingredients, but ones that are in season and should be taken advantage of then they are here! A great combination of Acorn Squash with Butternut Squash and a hint of sweetness from the Orange Sweet Potatoes- a perfect combination!

Ingredients:
1 clove garlic, minced
2 TBSP grape seed oil
1/2 onion, chopped
2 carrots, chopped
3 medium sweet potatoes, cubed
1 small-med. butternut squash
1 large acorn squash
4 cups of chicken broth
1/8 tsp curry powder
4 TBSP sour cream
s & p
This is what it looks like after simmering, before you puree it...
Directions:
Bake your squash on a roasting pan or cookie sheet on 375 for about 45 minutes- 1 hour (you can leave them whole, you just need to slice them in half and scoop out the seeds when they are done cooking and throw them away). Pierce them with a fork, when they are tender, remove them and let them cool until you can touch them. In a large soup pot, add your garlic, onion, and oil and saute for a few minutes. Add your sweet potatoes, carrots, curry and chicken broth and bring them to a boil. Let them cook for about 10 minutes, then add the flesh from your squash. Cover it and let it simmer for another 3o minutes. Puree your soup with a hand wand or a blender. Add s & p to taste and a dollop of sour cream to each bowl before you serve it.

Thursday, December 23, 2010

Molasses Crinkles...

OKAY- there are a million things left to do, but I couldn't help posting this new recipe that I tried today for Molasses Crinkles. I was searching for one that didn't have any shortening in it, and I stumbled upon these. I made a few changes and thought they turned out pretty darn delicious. I was later affirmed in that "darn delicious thought" when my husband came home and ate 5 of them.... did I mention he doesn't like sweets???? SLOW DOWN Buddy- those are Santa's cookies!!!

Here's the recipe, they have a wonderful combination of spices, they are dark golden in color and they are topped with sparkly sugar and cute little crinkles... you will love them too!

Ingredients
2 TBSP butter, melted
2 TBSP coconut oil (or vegetable oil)
1/3 cup dark molasses
1 cup dark brown sugar, firmly packed
1 large egg
2 tsp. vanilla
2 cups all purpose flour
2 tsp. baking soda
1 TBSP cinnamon
1.5 tsp. ginger
1/2 tsp. cloves
1/4 tsp. salt
white sugar to top the cookies with

(please excuse the random placement all over the cookie sheet- my 2 year was helping make these for Santa!!)


Directions:
Preheat your oven to 350. In a large mixing bowl add your melted butter and coconut oil, your molasses, brown sugar, egg and vanilla and mix well. In a separate bowl combine your flour, baking soda, cinnamon, ginger, cloves, and salt and sift until it's evenly blended. Then mix your dry ingredients into your wet. Mix well. Spoon out your dough and roll into 1 inch balls, then dip the tops of them into your white sugar. (I pour a little white sugar onto a salad plate and use that for dipping). Then place on your ungreased cookie sheet 2 inches apart and bake for 12-14 minutes. Remove and let them cool on a wire rack. They come out crinkled and chewy- yum!

Wednesday, December 22, 2010

Ideas for Christmas Morning...


I usually like to have something pre-made for breakfast on Christmas morning, something I can heat in the oven or something simple that doesn't take a lot of time so I can focus on my family and not cooking. I usually make one of the following dishes:
  • My Grandma's Spanish Potato Omelet- I make this the night before and then just warm it up in the oven the morning of. It's super filling and easy to serve in "pie pieces" or cut into cubes to snack on.
  • This yummy Breakfast Strata- you make this the night before, again, really simple, it takes about 10 minutes to put it together, then you refrigerate it over night and heat it in the oven the next morning.
  • And if you have guests coming over, you might enjoy something simple like these Banana Muffins or Blueberry ones... or you could even slice up some banana bread and have it out if you are having guests or want a treat for your family.
  • I am trying a new recipe this year for Pumpkin Nut Muffins with Raisins. I don't usually post a recipe before trying it, but I won't be trying it until Christmas Eve, so if anyone else wants to try something new, give this recipe a go- from the looks of it I think it should be very festive and tasty... we shall see!
Pumpkin Nut Muffins with Raisins:
2 eggs beaten
3/4 cup brown sugar
3 TBSP honey
1 can pumpkin
1/2 cup coconut oil, melted
1/3 cup water
1 cup whole wheat flour
1 cup all purpose flour
1.5 tsp cinnamon
1/2 tsp ginger
1/2 tsp ground cloves
1/2 tsp nutmeg
1/2 tsp salt
1/2 tsp baking powder
1 tsp baking soda
3/4 cup chopped nuts (walnuts or pecans)
1/2 cup raisins

Directions:
In a large mixing bowl, beat your eggs and add your sugar, honey, pumpkin, coconut oil and water. Then in a separate bowl, sift your flours, spices, baking soda & powder and salt. Then pour your dry ingredients into your wet and stir well. Add your nuts and raisins and mix well. Scoop into lined muffin tins and bake for 20-25 minutes. You can add a sprinkle of cinnamon & sugar mixture to the top if you desire.

Monday, December 20, 2010

Joe's Special

Looking for something simple and fast??? Here's an easy & quick recipe that's packed with protein and fresh greens- you can serve it anytime a day... breakfast, lunch or dinner... and it's easy to embellish if you want to add your favorites to it!


Ingredients:
1.5 lbs of ground turkey
1 clove garlic, minced
1/2 onion, finely chopped
4 cups fresh spinach
4-5 crimini mushrooms, chopped
4-6 eggs, scrambled
s & p
drizzle of grape seed oil or olive oil

Directions:
Drizzle some oil in your large skillet, add your onion, mushrooms and garlic and let it saute for a moment, then add your ground turkey and break it up and season it with s & p. Let it brown on one side, then turn it over and let it cook another 3 minutes. Then add your spinach and let it cook for 3-4 minutes until it starts to wilt. Next, scramble your eggs in a separate bowl and pour it over the mixture, stirring it well until the egg cooks thoroughly (like a scrambled egg). You're done! Serve it as a breakfast dish, or reheat it for lunch, or choose it for dinner with some sliced french bread. Enjoy!

Friday, December 17, 2010

Favorite Holiday Treats...

Here's a recap on some Holiday Favorites I have posted in the past... the first 3 recipes are super simple, just take a few minutes to make and are great if you have little helpers that want to join you! The later two recipes take a little more time, but are well worth the effort- they are both delicious! Try your hand at these if you are looking for a sweet treat to bring along to friends, neighbors, or holiday gatherings this Christmas Season...

5 Minute Fudge


Peanut Clusters


Chocolate and Carmel Turtles


Hazelnut & Dried Cherry Biscotti

Peppermint Cookies

Molasses Crinkles

Wednesday, December 15, 2010

Turkey Minestrone Soup


Here's another great recipe passed on from my mom. She's a great cook, always trying new things and passing on the good ones to me :) Perfect for a chilly day... enjoy!

Ingredients:
1 lb. ground turkey
2 cloves garlic, minced
1 onion, chopped
2 carrots, chopped
2 celery, chopped
8 cups chicken broth
1 can diced tomatoes or 1 cup fresh chopped
1 tsp. dried basil
1 tsp. dried oregano
1/2 cup orzo
1 can white beans
2 handfuls fresh spinach
s & p
** optional: handful of parmesan cheese to sprinkle on top

Directions:
Take out your large stock pot for making soup, add a drizzle of oil, your garlic, onion, carrots, celery and ground turkey and let it saute until your meat looses its pink color. Next add your seasoning, then your chicken broth, canned or fresh tomatoes, beans and orzo and let it cook for another 8 minutes. Lastly, add your spinach and let it simmer for about another 5 minutes or so then serve!

Monday, December 13, 2010

Throat Coat Tea...


Here's one of my favorite things to help with a sore throat if you are fighting one... it's called "Organic Throat Coat" tea and you can find it at your local grocery or health food store. It's made by Traditional Medicinals. I use it when my throat is sore, scratchy, or just when I want some yummy tea because it has great flavor and is really soothing. It is caffeine free so you can sip on it day or night. Give it a go this winter, see what you think!

Saturday, December 11, 2010

Homemade Chicken Noodle Soup


SO. SIMPLE. It practically makes itself :) And need I mention it's WAY better than any canned soup you've EVER HAD!?!

I throw 2 chicken breasts in a crock pot and make shredded chicken to add to this soup. If you have leftover chicken, a rotisserie chicken, or even if you want to bake some and chop it- any of those options would work fine.

Ingredients:
2 quarts chicken broth
1.5 cups chicken (I prefer shredded)
2 celery stalks, chopped
3 carrots, chopped
1 onion, chopped
2 garlic cloves, minced
1/2 tsp dried thyme
8 oz noodles (I use brown rice noodles)
1 TBSP fresh parsley, chopped
** a handful of fresh spinach for some extra greens :)

Directions:
So, in your large soup pot, drizzle some Grape Seed Oil, garlic, and your celery, carrots, onion, thyme and S & P and let it saute for 5 minutes. Then add your chicken broth and uncooked noodles and let them cook for 5 minutes. Lastly, add your cooked chicken and parsley (and spinach if you want) and let it simmer for another 5- 10, by then your noodles should be fully cooked (use them as your guide to when the soup is done!) Then, it's ready to serve and it's umm, umm, UMM GOOD!

Friday, December 10, 2010

BOOST your Immune System!

Ok.... so this past 2 weeks, we have been FIGHTING the nasty cold virus that has been going around... and it made me think, "Gosh, I should really add some things to my blog about amping up your immune system to help you fight off these nasty bugs because chances are, you have them in your households too or you are being exposed to them as we speak!" So, here are some of the natural remedies I do (and that I do to my children!) during the winter season... take it or leave it, you choose- but I just know that I will try just about anything to fore go getting sick--- or worse, having sick (and miserable!) kids!!!! DO you have any favorite home remedies??? Share them with us!!!!

Garlic:
Garlic is the BOMB. Lots of uses for it. For starters, if I am not breastfeeding or going on a hot date- I will chop up a clove of garlic as finely as I can, put it on a spoon and swallow it all at the first sign of a cold. I usually have to have a big glass of water to swallow it down with, then I chase it with some juice.... I am not going to lie- it's gross, but the garlic kills just about anything that's starting to wreak havoc on you... try it. I usually do it before bed and make sure you have food in your tummy.

Garlic Drops:
I just tried these for the first time, but my sister uses them all the time on her son who gets ear infections frequently. I got my first ear infection this past week and wanted to fore go the antibiotic, so I tried this remedy, and low and behold- it worked! Does it work every time with every infection?? No. But, if the infection isn't horrible (with puss and ooz) and hasn't been around too long, I think it's worth a shot. You just drop a few drops of warm garlic oil (you can make your own or purchase it at a health food store) in your ear, lay down for 15 minutes so it has time to settle in your ear and repeat that 3 times a day. Mine cleared up in a day... glad I tried it.

Unpasteurized Apple Cider Vinegar:
We used this growing up, I have been a fan of it for a long time. There are different theories to it- some people just gargle it, other gargle and swallow, others just swallow. Look it up, read about it, choose what you prefer, but USE IT! I do this at the first tingle of a sore throat and it works like a charm. Add sleep to the concoction and you just might have a fighting chance to rid yourself of the sickies!

Sleep:
Honestly people, don't underestimate this "home remedy", it's the most important for a tired immune system!

Supplements to Take, especially during the winter months:

Vitamin D for adults and Children


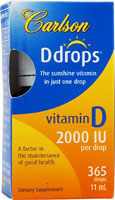
Carlson Vitamin D Drops

VITAMIN D!!!
Did you know most of the population is deficient in Vitamin D, the vitamin from the sun?? Did you know that it is a key component in your immune system and the strength it has to fight off illness?? Did you know you can have your Vitamin D level tested (via blood work the next time you have lab work done) and then you can begin deciding how much you should supplement with. I personally use Carlson's Vitamin D drops and I give my daughter the Kids Version. We take them everyday, they have no flavor and no odor and you only need a drop or two per day. Read more about Vitamin D here- it is SO important to your long term HEALTH!

Echinacea:
We have been a big fan of this for a long time, I really believe in it, I think it's a great immune booster perfect for the winter months. Look into adding it to your supplement list if it's not already there. Also, you can purchase Echinacea and Elderberry together- that's a winning combination for fighting viruses!

Elderberry:
See my previous post, this stuff rocks.

Disclaimer: I am not a nutritionist, a herbalist, a pharmacist, a doctor, or an authorized person at all.... I am just a mom who tries a bunch of things, some work all the time, some don't- it just depends on what you've got... I am just passing on what I've tried and learned in hopes that it spurs you on to at least look into some different options. If we beef up our immune systems, it just might help us fight off the next gross thing that comes our way, or maybe it will just shorten the duration that it stays. Take it or leave it, just don't blame it on me :)

***Stay tuned for some homemade, hardy, healthy soups, great for a sick day or a repairing immune system!

Wednesday, December 1, 2010

Advent Calendar...

A Homemade Advent Calendar...
So this doesn't have much to do with food, but I am gonna be a rebel and put it on my food blog anyways because I love the idea and it's super simple to make- granted, I am posting it a little late, but you could hurry and put one together and just miss the first few days of the season.... but look on the bright side, it will be ready for next year!
So, this Pottery Barn Advent Calendar (above) inspired me to make my own (mostly because I didn't want to pay $300 bucks! and because I didn't have a place to hang their contraption), but I liked the simplicity of it and thought I would make a quick, easy version of it.

I made 25 cones from craft paper by googling "paper cone templates"
Then I numbered them and punched holes in the back and strung them on a piece of twine.

So that's my version. And in each "party hat" as my daughter calls it, is a different activity or way to love and serve each other and friends, things I can do with a 2 year old to help being "others focused" during a season that can easily become "us focused". Here are some examples of what's in our days ahead:
  • Bake cookies and deliver them to our neighbors.
  • Buy a fun new toy and drop it off at a Local Toy Drive.
  • Make play dough and deliver it to a friend. (Stay TUNED for the recipe!!!)
  • Mail 2 Christmas Letters to friends.
  • Make Christmas Cards for our Grammies and Papa's with construction paper & glitter.
Then there are some fun family activities and crafts as well:
  • Make a Christmas ornament and hang it on the tree.
  • Rent a Christmas Cartoon and pop popcorn and watch it as a family.
  • Drive around a look at Christmas Lights with a special treat of your choice.
  • Read Christmas Books by the fire with Daddy.
... you get the idea.... make it personal to your family and age appropriate for your kids! Just wanted to share the Christmas love.... after all it is MY favorite time of the year!!

And I just found this blog that has some other great ideas as well as a darling homemade version of a similar advent calendar.

Monday, November 22, 2010

Shredded Chicken


Here's a quick post that I wanted to get make sure to add... it's perfect for busy days or seasons of life, so with the holidays nearing (and a new baby at our house!) we've been using it a lot! It's easy enough- thanks to the Crock pot!- to make it once a week and incorporate it into many different recipes. Take a look:

What to do... put 4 chicken breasts in the crock pot, add 1/4 cup water or chicken broth and cook on low for 8 hours. When it's done cooking, shred it and add some salt, pepper, and garlic powder and mix it well. Then I have a few staple meals I use this with, but feel free to get creative because the possibilities are endless! Here's a few examples to get you going:

Chicken Avocado Melts:
Cibata Rolls (I buy par-baked ones at Trader Joe's so that I can warm them up in the oven and they are toasted and crunchy.
Avocado, thinly sliced
Monterey Jack Cheese, thinly sliced
BBQ sauce
Shredded chicken

Simply toast your rolls, add some BBQ sauce, pile on the chicken and a few sliced of cheese, pop them back in your oven if you desire them thoroughly melted, then add the avocado and serve with a side salad. Makes for a simple dinner or a great left over lunch the next day.

Veggie Chop Salad with Shredded Chicken:
I go through just about every veggie in the drawer for this one. I chop romaine, brocholi, carrots, bell pepper, red cabbage or radicchio, cucumbers and avocado. Then I add some roasted slivered almonds, dried cranberries, a large scoop of shredded chicken and balsamic dressing. There is something extra flavorful about using the shredded chicken verses chopped- maybe because the shredded absorbs more of the dressing and disperses more evenly throughout the salad??? I don't know, but it sure is good- and GREEN! If you want to make it even hardier- add some kidney beans and hard boiled egg or serve it with a baked sweet potato... my personal favorite!

A few other recipes you could use it in, but there are tons out there:
  • Salsa Crock Pot Burritos
  • Tostada Pizza
  • BBQ chicken Pizza
  • Taco Salad: try it with chicken instead of beef!
Add a comment if there is something else you use it in!


Monday, November 15, 2010

Gluten-Free Flours....

So, lately- thanks to my sister and a few friends who eat (or are beginning to eat) "Gluten Free" because of health issues- I have become more curious about the option and the ways to incorporate a wheat free or "less wheat diet" into my own family's eating habits. If you talk around enough, you know that a lot of people (especially little kids) have allergies or intolerances to gluten. I also know, that a lot of diseases (especially autoimmunes) like Celiacs, Lupus, Leaky Gut, Crohn's and Hyperthyroidism do better on a "wheat free" diet.... all that to say, why not try to incorporate other options into our diets for a possible better physical feeling outcome. To me, the most important thing about my diet (and my new curiosity!) is that it is balanced and not extreme when it doesn't need to be. For me that means tons of fresh fruits and veggies, grains & legumes, clean meat, and limited processed foods (and of course my home baked goodies, cuz life would be boring without them!)... with an EMPHASIS on the Balanced PART! I want to enjoy life, eat healthy and not be a slave to my kitchen or my menu! Extremes have never been good for me and things seem to stick better when they are slowly incorporated and changed over time and not quickly overdone and forced.... but that's just me speaking. I'd like to be thinking that I would be continuing to grow and learn each year, eating better in 5 years than I am now... it's all a learning process :)

Here's a snip-it on what I have tried so far, and really, it's just a snip-it!

All Purpose Gluten Free Baking Flour
Oat Flour
Here are two of the products that have been recommended to me that I have just merley scrapped the surface with- I am not an expert in them at all! I have only tried baking a few things, but for what I have used it for, they have worked great for me and seem to be worth the switch. But I wanted to get your input! So, if you are avoiding gluten or wanting to incorporate other kinds of flour beside white and wheat into your diet, give us an update and tell us your findings- I would love to hear what you all use if you choose white or wheat alternatives! Please leave a comment and share with us your wisdom!!!


Friday, November 12, 2010

Update: Brownie Ice Cream Cupcakes...

So a few weeks past I posted a bunch of dessert recipes, "Scrumptious Desserts" for a week, and one thing I wanted to try was Joy the Baker's Brownie Ice Cream Sandwiches. I ended up making them for a birthday party for a good buddy of mine from my growing up years- and they were a hit at the party.


Here's what I did:
I actually used the Williams Sonoma Brownie Mix (posted in the "Taste This" Column- and they were delicious! I filled my cupcake tins half full with brownie mix and cooked them per the package directions. Then I let them completely cool, I scooped vanilla ice cream (per the birthday boy's request) and topped the ice cream with crunched chocolate cookies (the cat cookies from Trader Joe's). We added some sprinkles for festivities and then I popped them into the freezer to harden. I even made mini ones for the kids :) Take them out a few minutes before serving so they can soften just enough to pop them out of the tins, I had to use a butter knife to loosen them, but then came out fairly easily! Enjoy and thanks to JOY of BAKING for the great idea!!!

Tuesday, November 9, 2010

Crock Pot Salsa Chicken...

Here's an updated post, an old faithful that we have been using a lot as this baby is getting near and my cooking days are are wanting to be done! My trusty Crock Pot has come to the rescue again!
Ingredients:
2-3 chicken breasts
1 jar salsa
1 can black beans, drained

Directions:
So simple... take your package of chicken breasts, wash them, put them in the crock pot, pour in a jar of salsa. I use Trader Joe's Chunky Salsa and cook it on low for 8 hours or until done (mine was sooner than that, so peek in on it to see). When it's done take 2 forks and shred it in the crock pot, stir it around to soak up a little more salsa goodness and add a can of drained black beans to add some extra hardiness and flavor. Leave it on warm until you are ready to serve it. How's that for easy???

You can use these for chicken soft tacos, tostada pizza, burritos, or enchiladas.... and much more! Enjoy!!!

Saturday, October 30, 2010

Pomegranate Salad


Between all the "Scrumptious Desserts" and Halloween being here tomorrow, are you in need of something green and healthy?? Try this fun fall salad- it goes great as a side with a cup of soup for a fun "soup and salad" combo! Don't be overwhelmed by using the pomegranate, it is actually really easy to peel and get the seeds out... I promise! (see directions below) And the new Sweet Balsamic Dressing is such a great compliment to the tangy pomegranate seeds, the cinnamon in the nuts, the flavor of the mixed greens! Yum Yum I could have eaten the whole bowl!

Ingredients for the Salad:
1 bag of mixed greens, your choice
1 pomegranate, de-seeded
1 avocado
1/2 cup walnuts or pecans, plain or candied
a sprinkle of feta cheese

Sweet Balsamic Dressing: (double this if you are making it for more than 4)
1/4 cup balsamic vinegar
1/8 cup olive oil or grape seed oil
1/8 cup honey
1/2 tsp soy sauce
1/2 tsp yellow mustard

Directions:
I love this salad because it's quick and easy to make, it only takes a few minutes to throw it together! Wash and spin your mixed greens, soak and de-seed your pomegranate, slice your avocado, sprinkle your feta, add your walnuts (my recommendation is to candy them!) and toss with your favorite balsamic dressing! Enjoy!

To De-Seed your Pomegranates: Fill up a large bowl in your sink with cool water. Take your pomegranate and slice it in half with a sharp knife. Submerge one half of the pomegranate in the water and peel back the skin like you are turning it inside out. All the seeds will pop out and because it's under water there will be no spraying or staining of your clothes! Plus, all the seeds will sink to the bottom and all the excess stuff from the inside of the pomegranate will float to the top. Then you can skim off the top of the bowl with you hand and strain the seeds out for eating. I usually do a bunch at a time and store them in a ziplock bag in the fridge to snack on!

Friday, October 29, 2010

And the WInner of the 200th Post is....

Meghan Underwood!!!!
Meghan, thanks for all your comments and feedback on all the recipes you try! I love hearing from you and getting your input! Hope you enjoy the treat to Trader Joe's... keep an eye out for it in your mailbox!

Thanks to everyone else who played along... here's to another 200 more... well, we'll see!

Chocolate Chip Oatmeal Cookies with Cherries and Nuts

I made these a few weekends ago to thank some of my sweet friends who threw me Baby Shower... and I thought they were so delicious I had a hard time saving some for them, lucky for me the recipe makes a lot! I found this recipe at Sprouted Kitchen and I followed it almost exactly as she said with just a few minor changes. Her cookies looked soft and chewy, mine were crispy and crunchy- either way they are delicious!

Entry #5 of Scrumptious Treats:

Ingredients:
1 cup unbleached all purpose flour
1/4 cup whole wheat flour
3/4 tsp baking soda
1/2 tsp baking soda
1/2 tsp salt
1 1/4 cups old fashioned rolled oats
1 cup chopped & toasted pecans (I used sliced almonds)
1/2 cup dried cherries, chopped
1 cup chocolate chips
3/4 cup butter, softened
1.5 cups packed dark brown sugar or muscavado
1 egg
1 tsp vanilla

Directions:
Preheat your oven to 350. In a large bowl, mix your flours, baking soda, baking powder, and salt and sift well. In another bowl, beat on medium your butter, sugar, egg, and vanilla. Then add your flour mixture and continue to beat on medium high until it's well blended. Then pour in your oats, nuts, dried cherries, and chocolate chips. and stir by hand until well blended. Scoop onto cookies sheets and cook for 8-10 minutes for soft cookies and 10- 12 for crunchy ones. Remove from oven and place on wire racks to cool.

Thursday, October 28, 2010

Lime Honey Dew Sorbet

Entry # 4 of Scrumptious Desserts:
This is a summer dessert that I am sad to say I never got around to posting. It is more icy, refreshing treat that kinda reminds me of a margarita... maybe because of the fresh lime flavor. It is a perfectly light and healthy dessert that works really well after a mexican dish!

Ingredients:
5 cups cubed fresh Honey Dew
1/2 cup fresh lime juice, about 2 limes
1/8 cup honey, add more if needed to taste
1 TBSP water
2 tsp. lime zest, about 1 lime peel

Directions:
Put all the ingredients in your Vitamix or blender and puree until smooth. Pour in an air tight container and freeze until solid.

Wednesday, October 27, 2010

Cupcake Sandwiches...

Entry #4 of Scrumptious Desserts:
Do you ever had a few left over cupcakes that didn't get frosting because you ran out? Do you have a the family member that doesn't eat frosting?? Ever forget the frosting at the store or realize that you don't have time to make it??? Well, here are some solutions to Frosting Free Cupcakes!
A simple idea: Take a plain cupcake, slice the top off and add a scoop of ice cream to it, place the top back on, sprinkle some powdered sugar on top, and add a fresh scoop of berries to the side.
Or another simple solution.... (sorry for the horrible picture, it's always awkward to take a picture of your food in a restarunt, one has to be quick and sometimes not in focus when doing this!) you can put a dollop of homemade Whipping Cream and a sprinkling (or spoonful) of your favorite chopped candy bar... this picture has Heath Bar crumbled on top. Make sure to chill your whipping cream before hand.
And here's a little something that I want to try out... the next time I have to bring dessert somewhere, I found it on a blog called "Joy the Baker" and thought it was really cute and seemed really simple.... if you give it a whirl, leave us a comment and let us know how it turns out! (see her blog for directions.... or stay tuned and maybe I will make them this month!) For a quick review, it's a layer of brownie on the bottom, a scoop of ice cream in the middle, some fudge and topped of with rainbow sprinkles- cute huh?!

I know both examples were with chocolate cupcakes but get creative, you could really branch out and use yellow cupcakes with chocolate ice cream or spice cupcakes with vanilla bean or lemon cupcakes with french vanilla, or chocolcate fudge cupcakes with mint chocolate chip.... do I need to go on??? Have fun!

Tuesday, October 26, 2010

Pumpkin Chocolate Chip Cookies

One of the reasons I love the fall is all the pumpkins! I love to decorate with pumkins, I love the smell of pumpkin scented anythings, and I delight in the flavors of pumpkins- especially with chocolate! So needless to say, this is recipe is a sure thing for the fall. They are easy to make and they ARE healthy! A big thanks to Amy Moxley from Land of Fruits and Veggies who shared this recipe with us, check out her blog for more great vegan ideas!
Entry #3 for Scrumptious Desserts:
3/4 cup raw coconut crystals or brown sugar
3 TBSP honey
1 can pumpkin (15 oz.)
3/4 cup coconut oil
2 tsp. vanilla
3 cups flour (any combination of your likings: I used 2 cups brown rice flour, 1 cup Coconut Flour Blend)
1.5 tsp baking powder
1.5 tsp baking soda
3/4 tsp salt
1 tsp cinnamon
3/4 tsp nutmeg
1/2 tsp ginger
1 cup chocolate chips

*** Note: Amy's recipe calls for EITHER coconut oil or unsweetened applesauce- I have made them both ways and I DEFINITELY recommend the coconut oil... I don't think I'd make them again with the applesauce. Just a heads up to you!

Directions:
Preheat your oven to 350. Beat your sugar, honey, pumpkin, coconut oil, and vanilla until they are well blended. In a separate bowl mix your flour, baking soda, baking powder, salt and spices. Pour your flour mixture into your pumpkin mixture and stir well, adding and stirring in your chocolate chips. Grease your cookie sheets and drop spoonfuls of dough, cook for 12- 15 minutes. Let them cool on wire racks and enjoy!